Quickly
create 2-D orhtographic views?
An easy way to create multiple
orthographic views in
ANVIL EXPRESS is to use the 2-D Profile project icon. This icon is found on the
2-D Geometry toolbar by clicking the 2-D/3-D Project curves icon. This functionality is
useful when creating the views used by SNAP2-3D or for parametric drafting. 2-D Profile
Project allows you to create the Right end view, Left end view, Front view, and Back view,
plus oblique views.
After you click the
2-D Profile Project icon, you will be asked for the projection direction. This will depend
on which view you are trying to create. After choosing a direction, you are prompted to
select the curves that you want to project. You must determine which entities you want to
place in the view you are trying to create.
Next you are
prompted for a projection mode. This allows you to create the "thickness" of the
view.
Finally, you are
asked for the projection dash mode. This will automatically determine which entities are
hidden and will give them a dashed font if you choose the solid and dashed option. Some
trimming may be required, but this functionality will save you construction time.
Back to Top
Change
the location of my part files?
The default location for Express part files (.AXP) is determined when
ANVIL Express is installed. The default location might be
C:\Express\usr\parts. This location is saved in the Preferences, and can
be changed at any time by doing the following:
- From the main
Express menu, choose File / Preferences. Choose the System
tab page in the Preferences dialog box.
- In the
Directories section, locate Part files in the Keyword column.
The path shown in the Directory column is the current location of
Express parts. To change it, click the Part files keyword.
- The current part
path will display in the middle of the dialog. From here you can click
the Browse button to locate the new part folder.
- Click Proceed
to close and update the Preference settings.
Back to Top
Change
the way Toolbars are displayed?
ANVIL EXPRESS lets you control the
number of free-floating toolbars that remain on screen as you work. This
does not apply to floating toolbars that have been docked at the edges of
the work area.
From the File menu,
choose Preferences, choose the setting you want from the Toolbar Display drop-down
menu in the System tab page. There are three options:
- Keep None - when
an icon is clicked from an open floating toolbar, the toolbar is
immediately closed.
- Keep One - when
an icon is clicked from an open floating toolbar, the toolbar remains
open for repeated icons to be used. If a different expanding is
clicked to open a new floating toolbar, then the previous toolbar is
automatically closed.
- Keep All -
behaves the same as Keep One, except that previous floating toolbars
are not closed when another toolbar is opened, allowing multiple
toolbars to be open at one time.
NOTE: If some
messages are too long for the available space or if some dialog boxes don't look quite
right, you probably need to reset the system font to the Windows default, which is Small
Fonts. To do so, save your work and close ANVIL EXPRESS (and all other open programs).
Then, right-click in an open part of the Windows desktop and then choose Properties from
the pop-up menu. Pick the Settings tab, choose Small Fonts from the Font Size drop-down
list, pick the OK button and follow the on-screen instructions. After that, if you need to
adjust the size of menu text, scroll bars, and other shared interface elements, just
repeat the process and pick the Appearance tab in the Display Properties dialog box. Note
that changes made in the Display Properties dialog box apply to all your Windows programs,
not just ANVIL EXPRESS.
Back to Top
Create
Components?
Components are a means to save geometric data from any ANVIL part to the
disk for use in other parts. This is a very efficient way to transfer
geometry between parts. Do the following to create component
masters:
- Pick the Manage
Master icon in the Object toolbar.
- Enter a name for
the component. The default is the part name.
- Specify the type
of Origin Mode for component creation. An existing Point or Coordinates
allows for more precise placement of the component instance.
- Click the Select
Entities button and the select the desired component entities.
- Set the Instance
Creation Mode to No Instance. This leaves your selected entities
unchanged.
- Click the Create
Master button to create a local master (in the part) and a global master
(.gcm) on the disk.
To use the global
master in this or another part, do the
following to create component instances:
- Pick the Manage
Instance icon in the Object toolbar.
- Choose the
Component Name
from the pull-down list or browse the hard drive for the desired component.
- You can enter a scale and
rotation value. Both values are applied relative to the origin
position you specified when the component was created.
- Choose an Origin
Mode for locating the component.
- Click the Create
button to create a component instance.
There are numerous
properties (modals) that can be controlled when creating or retrieving
components. You'll find these modals in the Component Modal dialog in the
Object toolbar.
Back to Top
Change
the location Dialog boxes are displayed?
You can adjust the
position that dialog boxes are displayed so they don't overlay geometry
underneath the dialog.
From the Express
menu, choose the Window / Dialog Position menu.
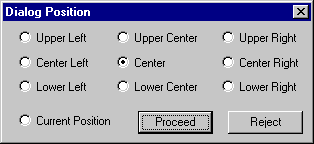
From this dialog you
can choose a position for most dialogs in Express, enabling you to keep
them in a portion of the work area where they don't cover geometry your
working on.
Back to Top
| 